iperf
利用 iperf 測試網路效能
下載安裝
官網中有各種版本提供使用,選擇好你要使用的環境下載並解壓就能使用。
iperf命令說明
將下面的整理一下,示範將Server、Client共通歸類一起做說明,其他的再分開解釋。
使用iperf需要要有2台電腦,一台為serve端,另一台為client端,測試環境使用windows環境與Giga網路來當做示範,分為Server與Client。
Usage: iperf [-s|-c host] [options]
       iperf [-h|--help] [-v|--version]

Client/Server:
  -f, --format    [kmKM]   format to report: Kbits, Mbits, KBytes, MBytes
  -i, --interval  #        seconds between periodic bandwidth reports
  -l, --len       #[KM]    length of buffer to read or write (default 8 KB)
  -m, --print_mss          print TCP maximum segment size (MTU - TCP/IP header)
  -o, --output    <filename> output the report or error message to this specified file
  -p, --port      #        server port to listen on/connect to
  -u, --udp                use UDP rather than TCP
  -w, --window    #[KM]    TCP window size (socket buffer size)
  -B, --bind      <host>   bind to <host>, an interface or multicast address
  -C, --compatibility      for use with older versions does not sent extra msgs
  -M, --mss       #        set TCP maximum segment size (MTU - 40 bytes)
  -N, --nodelay            set TCP no delay, disabling Nagle's Algorithm
  -V, --IPv6Version        Set the domain to IPv6

Server specific:
  -s, --server             run in server mode
  -U, --single_udp         run in single threaded UDP mode
  -D, --daemon             run the server as a daemon

Client specific:
  -b, --bandwidth #[KM]    for UDP, bandwidth to send at in bits/sec
                           (default 1 Mbit/sec, implies -u)
  -c, --client    <host>   run in client mode, connecting to <host>
  -d, --dualtest           Do a bidirectional test simultaneously
  -n, --num       #[KM]    number of bytes to transmit (instead of -t)
  -r, --tradeoff           Do a bidirectional test individually
  -t, --time      #        time in seconds to transmit for (default 10 secs)
  -F, --fileinput <name>   input the data to be transmitted from a file
  -I, --stdin              input the data to be transmitted from stdin
  -L, --listenport #       port to receive bidirectional tests back on
  -P, --parallel  #        number of parallel client threads to run
  -T, --ttl       #        time-to-live, for multicast (default 1)
  -Z, --linux-congestion <algo>  set TCP congestion control algorithm (Linux only)

Miscellaneous:
  -x, --reportexclude [CDMSV]   exclude C(connection) D(data) M(multicast) S(settings) V(server) reports
  -y, --reportstyle C      report as a Comma-Separated Values
  -h, --help               print this message and quit
  -v, --version            print version information and quit

[KM] Indicates options that support a K or M suffix for kilo- or mega-

The TCP window size option can be set by the environment variable
TCP_WINDOW_SIZE. Most other options can be set by an environment variable
IPERF_<long option name>, such as IPERF_BANDWIDTH.
參數說明

-s 啟動server模式,例如:iperf -s
-c 啟動client模式,命令後接server的位址,例如:iperf -c 192.168.1.3

通用參數

-f [k|m|K|M] 報告結果顯示的單位,以Kbits, Mbits, KBytes, MBytes,例如:iperf -c 192.168.1.3 -f K
-i sec 報告顯示的時間間隔(以秒為單位),例如:iperf -c 192.168.1.3 -i 2
-l [KM] 緩衝區大小,預設是8KB,例如:iperf -c 192.168.1.3 -l 16
-m 顯示MTU最大值
-o 將報告與錯誤信息輸出到檔案,例如:iperf -c 192.168.1.3 -o c:\iperf-log.txt
-p server使用的連接埠或client使用的連接埠,兩端連接埠要一致,例如:iperf -s -p 9999
-u 使用udp通訊規格
-w 指定TCP框架大小,預設是8KB
-B 綁定一個主機地址,可以是介面或是廣播位址,當主機端同時有很多位址時才需要綁定
-C 相容舊版本(兩端版本不致時使用)
-M 設定TCP封包的最大MTU值
-N 設定TCP不延時
-V 傳輸ipv6資料封包


server專用

-D 背景服務方式運行,例如:iperf -s -D
-U 使用單一執行緒使用UDp模式


client專用

-b UDP測試專用,可以設定每秒傳送的速度
-d 同時進行雙向傳輸測試
-n 指定傳輸的大小,例如: iperf -c 192.168.1.3 -n 100000
-r 單獨進行雙向傳輸測試
-t 測試時間長度,預設10秒,例如: iperf -c 192.168.1.3 -t 5
-F 使用指定檔案來傳輸
-I 使用stdin方式當做傳輸內容
-T 指定ttl值
操作示範
[Server(伺服端)]
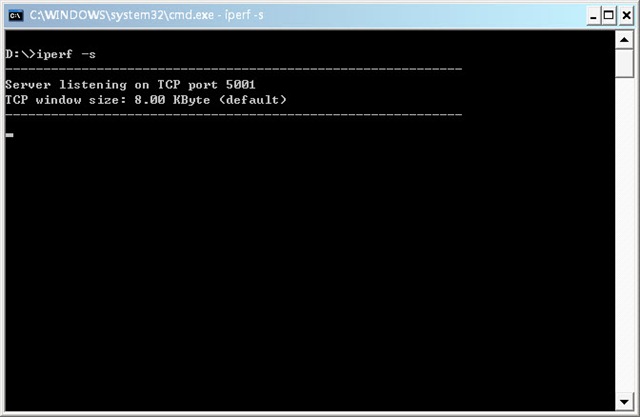
Server端的命令預設非常的簡單,只要執行
iperf –s
如下圖就開始運作。
[Client(客戶端)]
Client端設定比較多,主要是看你要選擇怎麼樣的測試方式,示範中使用下面的命令:
iperf –c 192.168.3.58 –w 100M –t 120 –i 10
解釋一下:
-c 192.168.3.58 :Server端的IP

-w 100M :測試的檔案大小

-t  120:監視測量數據時間為120秒

-i  10:每隔10秒將數據顯示出來
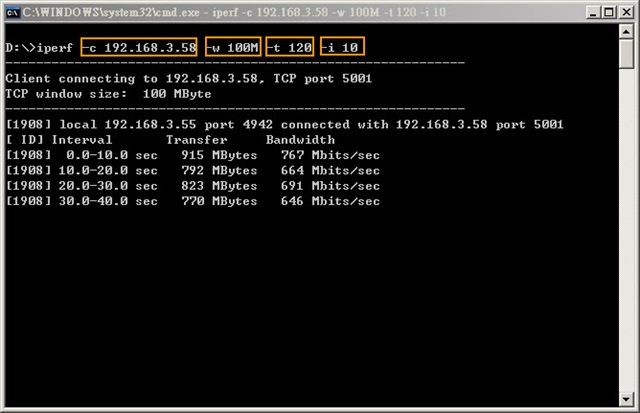 依照所執行的命令需要測約120秒左右時間,看到下圖結果報告顯示總共測試從0.0~121.3秒,傳輸9.28GByte,
 平均速度(Bandwidth)約在657Mbits/sec之間,對於Giga環境已經發揮6成的速度,這在Giga環境下測試的值並不是理想值,測試時必需要關閉一些網路軟體或是內建的QoS機制才有可能發揮到極速,所以速度並沒有我第一次在測試時平均可以跑到800Mbits/sec。